If you work with sheet metal, you know the struggle of adding strong threads to ultra-thin parts. As a fabrication expert who has spent years on the factory floor at ShincoFab, I’ve overseen the installation of millions of PEM fasteners. I have also seen thousands of customer parts ruined before they even reached our assembly line by the wrong hardware or bad installations.
That is why I wrote this guide.
In this article, you will learn what PEM fasteners are and why they often outperform welding. I will show you how to pick the right hardware for your metal, the engineering rules you must follow to prevent warping, and how our own operators at ShincoFab troubleshoot mistakes on the fly at the press machine.
By the end of this post, you will know how to use PEM fasteners to save time, cut costs, and build a better product.
The Golden Rule of PEM Fasteners
Treating PEM fasteners as a last-minute assembly afterthought often leads to scrapped parts.
I see this mistake frequently when clients send us their initial CAD files. You design a great enclosure, nest the flat patterns for laser cutting, and then try to figure out how to bolt it together later. That is a recipe for scrap.
Here is the golden rule we enforce at ShincoFab: You must design your sheet metal around the hardware. You have to do this before a single piece of metal is cut on the laser or punched on the CNC turret.
To save time and money, you need a solid plan upfront. You have to match your material hardness correctly. You need strict edge clearances so your metal doesn’t warp during the press brake bending process, and you must map out your proper installation sequence.
What is a PEM Fastener?
PEM® is a registered trademark of PennEngineering, the original developer of self-clinching technology. Think of it as a permanent nut or stud made specifically for thin sheet metal.
Normally, you can’t tap threads into ultra-thin metal. There isn’t enough material for a screw to grab onto. PEM fasteners effectively solve this problem.
Here is how they work:
- Punch a hole: You cut a precisely sized hole into your sheet metal.
- Press it in: You use a machine press to squeeze the fastener straight into the hole.
- Lock it down: The pressure forces the sheet metal to cold flow into a special groove on the base of the fastener.
Once installed, you have a rock-solid, permanent thread that is highly resistant to spinning or popping out. It is a simple but brilliant piece of engineering.

Why Use PEM Fasteners?
Create Strong Threads in Ultra-Thin Metal
If you try to thread a 0.030-inch piece of aluminum, your screw will strip out. There is no meat there.
PEM fasteners give you deep, load-bearing threads in metal as thin as 0.020 inches. You get heavy-duty holding power without adding thick, heavy plates to your design.
Clean, Flush Finish on the Backside
Nobody wants ugly hardware sticking out of the back of a sleek enclosure.
When you press a PEM fastener in, the head sits flush with the metal. Your backside stays smooth. This gives your parts a clean, professional look. It also ensures the fastener won’t scratch or catch on internal components.
Skip the Welder
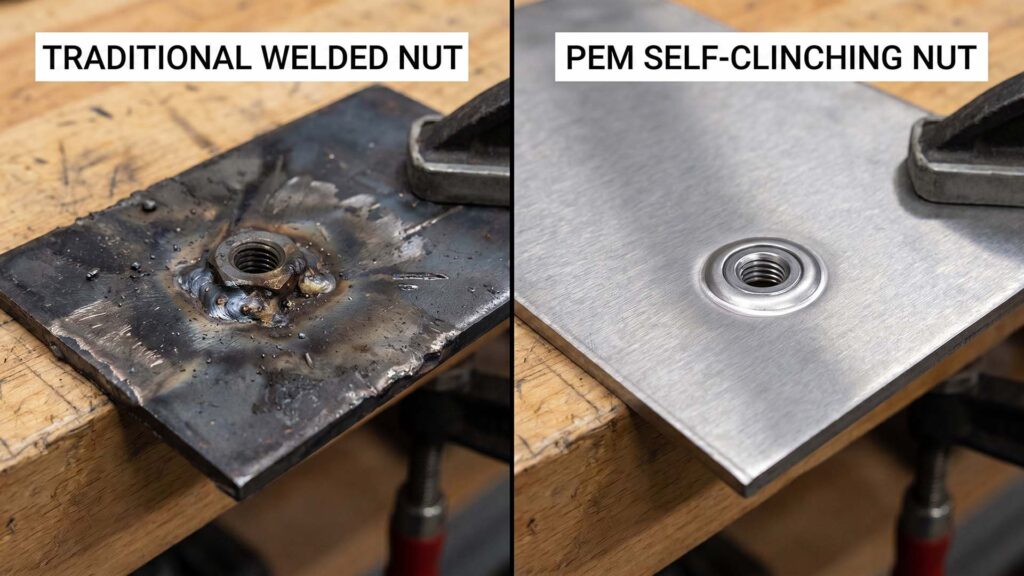
Weld nuts can be a massive headache. The heat warps thin sheet metal. It ruins your tolerances and leaves a nasty, burned mess.
With PEM fasteners, you skip the welder entirely. There is no heat, no splatter, and no grinding required. It is a clean, cold-press process from start to finish.
Save Assembly Time and Lower Costs
Let’s talk about your bottom line. Yes, a single PEM nut might cost a few cents more than a standard loose nut. But look at the big picture.
You aren’t paying a skilled welder to attach them. You also aren’t forcing your assembly team to fumble around with tiny wrenches, loose washers, and dropped nuts.
Factory data shows that switching from welded nuts to PEM fasteners reduces total assembly time by up to 50%.
You cut out the welding, the grinding, and the two-handed wrenching. That drops your overall cost per part dramatically.
Where Are PEM Fasteners Used?
You probably use products held together by PEM fasteners every single day. Because they save space and weight, they are the go-to choice for some of the biggest industries in the world.
Automotive and EV Charging
Look under the hood of a modern electric vehicle. Weight is a critical factor. Engineers use PEM fasteners to secure copper busbars and battery panels. They provide strong, conductive connections without adding bulky metal plates.
Consumer Electronics
Look at your smartphone or laptop. These devices are packed with tiny parts. Micro-PEM fasteners keep your electronics incredibly thin. They hold motherboards and screens in tight spaces where standard screws would be too big.
Medical Devices
In a hospital, equipment must be exceptionally clean. Weld splatter and loose metal shavings are dangerous. PEM hardware leaves a flush, smooth surface that is easy to sanitize. You will find them inside MRI machines, ventilators, and surgical robots.
Data and Telecom Enclosures
Think about massive server racks holding heavy computers. Telecom companies need strong metal frames that fit into tight server rooms. PEM fasteners keep these cabinets rigid, compact, and very easy to assemble.
PEM Fasteners vs. Rivet Nuts vs. Weld Nuts: Which Should You Choose?
| Fastener Type | Best For | Requires 2-Sided Access | Heat Applied |
|---|---|---|---|
| PEM Fastener | Thin sheet metal, flush finish | Yes | No |
| Rivet Nut (Rivnut) | Hollow metal tubes, blind holes | No | No |
| Weld Nut | Thick steel, heavy structural loads | No | Yes |
If your project uses thin metal and needs a smooth, flush finish, PEM is your winner. If you are working with a hollow tube where you can’t reach the inside, use a blind rivet nut. If you are building a heavy-duty trailer out of thick steel, grab a weld nut and fire up your welder.
The 4 Most Popular Types of PEM Hardware
There are hundreds of specialized PEM fasteners out there. But for most fabrication projects, you only need to know these four.
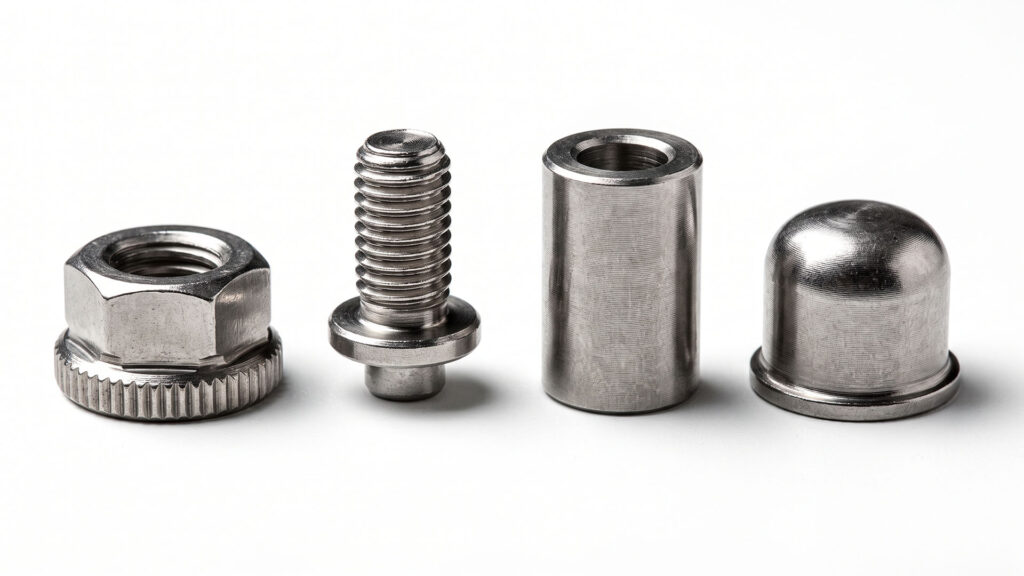
The four most popular types of PEM hardware are self-clinching nuts, self-clinching studs and pins, self-clinching standoffs, and blind fasteners.
Self-Clinching Nuts
This is your bread and butter. Self-clinching nuts give you strong, permanent internal threads. Instead of fumbling behind a panel with a wrench, you drive your bolt into the metal. The backside stays flat and flush.
Self-Clinching Studs & Pins
Need a threaded post to hang a part on? Use a self-clinching stud. It acts like a permanent bolt sticking straight out of your sheet metal. This makes heavy assemblies incredibly easy. You slide your components over the studs and tighten down a nut on top. Unthreaded pins are also available for quick part alignment.
Self-Clinching Standoffs
Sometimes you need a specific gap between two components. That is where standoffs come in. They create a rigid space between layers. You will see these everywhere in electronics. They keep sensitive circuit boards safely suspended above the metal chassis so they don’t short out.
Surface Mount & Blind Fasteners
These are built for special cases. Surface mount fasteners are soldered directly onto printed circuit boards, like a microchip. Blind fasteners are a bit different. They have a closed end. This blocks dust, dirt, and moisture from traveling through the threaded hole, making them ideal for sealed outdoor enclosures.
How to Pick the Perfect Fastener for Your Project
Picking the wrong fastener can scrap your part. To get this right, you must follow these five engineering rules. These aren’t textbook theories; these are rules we strictly enforce on our own fabrication floor.
Rule #1: The Fastener Must Be Harder Than the Metal
This is the whole secret to self-clinching hardware. The fastener has to squeeze and deform the sheet metal around it.
If your fastener is softer than your sheet metal, the fastener will crush flat. We occasionally receive prints from engineers asking us to press standard aluminum PEM nuts into 304 Stainless Steel. The installation will fail. Always check the hardness ratings on the spec sheet before you design.
Rule #2: Match Materials to Avoid Corrosion
Mixing the wrong metals is a significant mistake. Galvanic corrosion between dissimilar metals, like stainless steel and aluminum, will rapidly degrade your parts.
A Real Example from our shop: We recently re-manufactured a batch of outdoor telecom enclosures for a client whose previous supplier failed them. The old shop used standard 300-series stainless steel fasteners pressed into raw 5052 aluminum panels. Within six months in the field, galvanic corrosion caused the aluminum around the fasteners to turn into white powder. The joints completely failed. At ShincoFab, we caught this in the redesign phase and switched them to specially plated steel hardware.
Rule #3: Check Your Minimum Sheet Thickness
Every PEM fastener has a minimum sheet thickness. If your metal is too thin, the fastener won’t have enough material to grip. It will punch a giant hole through your part. When our engineering team reviews your drawings, this is the first thing we check. For example, if you are using 0.020″ aluminum, we cannot use standard nuts; we have to source specialized micro-hardware.
Rule #4: Understand Your Load Requirements
How much weight is hanging on this joint? You need to know before you finalize your design. The holding power of these tiny fasteners will surprise you.
A standard M4 heat-treated steel PEM nut installed in 1.5mm cold-rolled steel can withstand over 400 lbs of push-out force and provides roughly 45 in-lbs (5 Nm) of torque-out resistance, according to PennEngineering’s official self-clinching performance data. Do not guess. Always check the manufacturer’s engineering charts to ensure the hardware can safely hold your specific load without catastrophic joint failure
Do not guess. Check the engineering charts to ensure the hardware can hold your specific load.
Rule #5: Leave Enough Clearance Around Edges and Bends
You cannot place a fastener directly on the edge of your metal.
Pressing a fastener moves a lot of material. If you get too close to an edge, the pressure will bulge the side of your part. If you get too close to a bend, the metal will warp or crack. How close can you get?
Use this quick formula: The distance from the center of your hole to the edge of the sheet must be at least 1.5 times the hole diameter. If you have a 6mm hole, keep it at least 9mm away from any edge.
How to Install PEM Fasteners the Right Way
Follow these three steps.
Get the Hole Size Right
Your hole size must be precise. If the hole is too small, the fastener will crush the metal. If the hole is too big, the fastener will spin out when you tighten a bolt. At ShincoFab, we don’t guess. We program our Amada laser cutters and CNC punches to hit tight tolerances within +/- 0.003 inches specifically for hardware holes, which strictly aligns with aerospace-grade fastener clearance tolerances.
Use a Press, Never a Hammer
Put the hammer away. You should not pound a PEM fastener into place. Self-clinching hardware needs a slow, steady squeeze. This gives the cold metal enough time to flow into the fastener’s locking grooves.
Factory Insight: On our shop floor, we strictly use Haeger parallel-acting insertion presses with auto-feed bowls. A recent internal audit showed that using these precision hydraulic presses dropped our hardware scrap rate to nearly zero, compared to manual impact methods used by lower-tier shops.
Install Before Applying Surface Finishes
Process sequencing is critical. Always install your hardware into bare metal. You must do this before you paint, anodize, or powder-coat your parts.
Why? We’ve seen clients ask us to press fasteners into pre-powder-coated panels. If you do this, the fastener will grip the soft paint instead of the hard metal. The pressure can also crack your finish. Our standard operating procedure (SOP) is always: Cut -> Bend -> Press Hardware -> Mask -> Powder Coat.
How to Troubleshoot Common Installation Failures
Even with a solid plan, things can go wrong on the shop floor. When an operator makes a mistake, you need to catch it immediately.
How to Spot a Bad Installation on the Floor
Do not wait until final assembly to find out a fastener failed. Our QC (Quality Control) team uses go/no-go thread gauges directly at the press station.
A good installation sits flush on the back side of the sheet. If you see a gap, the press did not use enough force. A failed push-out test looks like a blowout. The fastener punches through the back of the sheet metal, taking a broken ring of material with it.
Why did my metal warp?
You press a fastener in, and suddenly your flat panel looks like a potato chip. This is a nightmare for aesthetic parts like audio amplifier casings.
This happens when you install hardware too close to an edge or a bend. The immense pressure of the press has to go somewhere. If there isn’t enough surrounding metal to absorb that stress, your part will warp and distort.
Can You Remove a PEM Fastener if You Make a Mistake?
Mistakes happen. Maybe an operator installed a nut backward. Or maybe a stud was pressed into the wrong hole.
Don’t panic and throw the part in the trash. We train our junior operators on how to salvage these parts without ruining the sheet metal.
Whatever you do, do not grab a hammer and try to smash it out. You will severely warp the panel.
Instead, grab a drill bit that is slightly larger than the internal threads. Carefully drill into the center of the hardware (we usually do this on a drill press to ensure we don’t drill into the base metal). You only need to drill deep enough to break that cold-flow clinching ring.
Once that locking ring is destroyed, flip the part over, place a pin punch over the hole, and gently tap the remaining piece out.
Conclusion
Using PEM fasteners does not have to be a guessing game. You now have the blueprint to get it right consistently.
Remember the golden rule: design your sheet metal around your hardware. Match your material hardness, check your edge clearances, and avoid using a hammer to install them. If you follow these steps, you will stop scrapping parts and start saving serious assembly time.
At ShincoFab, we press thousands of these fasteners into sheet metal every day. As a custom fabrication factory, we know firsthand that getting the hardware right is the secret to a high-quality final product.
Stop treating your fasteners as a last-minute detail. Plan your hardware early, follow the engineering rules, and your next build will be a total breeze.