Sheet metal hemming is a fabrication process that folds a raw, sharp edge of sheet metal back onto itself to create a safe, smooth, and rigid border.
Think about your favorite pair of jeans. Look at the bottom of the leg. The fabric is folded up and stitched into place so it won’t fray. A sheet metal hem is exactly the same concept, just replacing fabric with steel or aluminum.
But on our shop floor here at ShincoFab, the stakes are a bit higher than frayed denim. Every day, we take dangerous, unfinished borders and bend them over on our press brakes to create smooth, safe edges. It sounds simple, but after handling thousands of custom parts, I can tell you firsthand that a proper hem completely changes how your metal part survives in the real world.
Before discussing why this process is necessary, let me clear up a mix-up we see in client blueprints almost weekly.
The Real Difference Between Hemming and Seaming
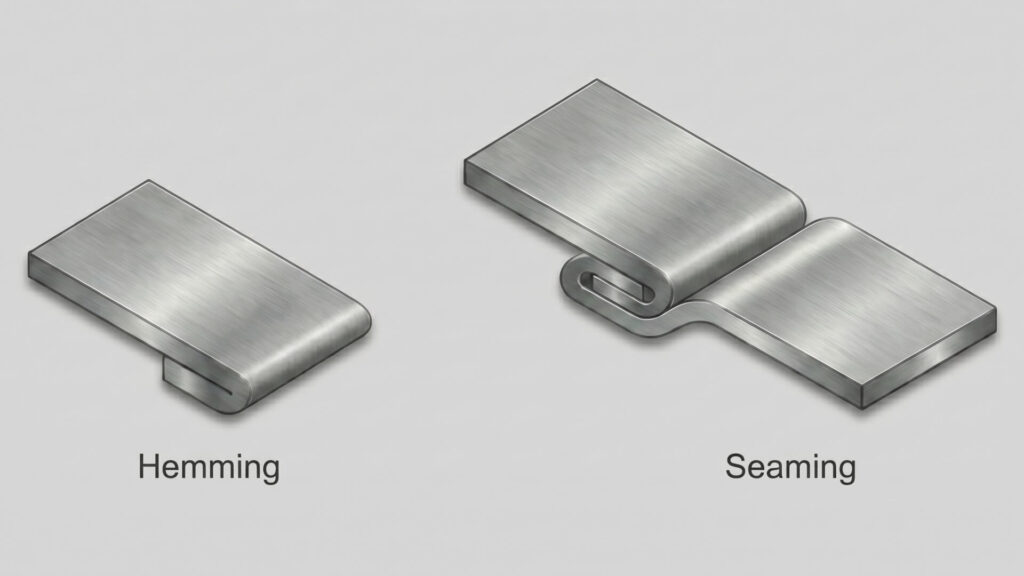
When we review CAD files sent by engineers and product designers, we often see the words “hemming” and “seaming” used interchangeably. They don’t mean the same thing, and they require completely different tooling on our end.
The main difference between hemming and seaming depends on the number of metal pieces involved:
- Hemming finishes a single edge. We take one piece of sheet metal and fold it over itself using a hemming die.
- Seaming joins two separate pieces. We take two pieces of sheet metal, link their edges together, and lock them tight. Think of the top of a soup can.
Simply put, we hem to finish a raw edge. We seam to connect two parts. Now that you know we are only dealing with one piece of metal at a time, let’s look at why folding that edge is usually non-negotiable in our daily fabrication runs.
Why Do You Need a Hem?
Straight off our laser cutting machines or shears, a raw edge of 18-gauge metal acts as a razor blade. You do not want to leave it that way.
In our experience, adding a hem gives our clients three massive benefits:
- Safety (It saves fingers). Our operators physically handle these parts. If someone grabs your part on an assembly line later, they shouldn’t bleed. A hem turns a sharp edge hazard into a safe, smooth border by using an engineering control to eliminate or minimize employee exposure.
- It adds serious strength. Folding the metal doubles its thickness right where it is weakest. We often suggest hems to clients to stiffen a floppy panel, stopping it from wobbling without having to upgrade to a thicker, heavier gauge of sheet metal.
- It looks professional. Cut edges have rough spots, burrs, and heat marks from the laser. A hem hides that mess and gives products—like the commercial kitchen enclosures we build—a premium, clean finish.
The 4 Common Types of Sheet Metal Hems
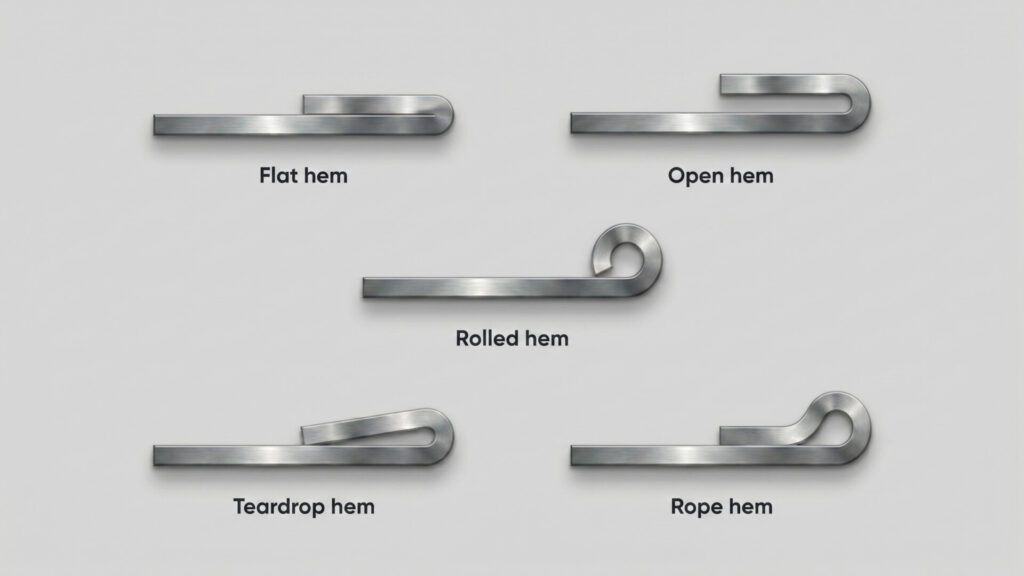
Not all hems are the same. On the ShincoFab floor, the choice depends on your part’s application. There are four main types of sheet metal hems used in fabrication: closed (flat) hems, open hems, teardrop hems, and rolled hems.
There are four main types of sheet metal hems used in fabrication: closed (flat) hems, open hems, teardrop hems, and rolled hems. Provide a quick reference for your design:
| Hem Type | Structure / Profile | Best Application |
|---|---|---|
| Closed (Flat) Hem | Folded over and pressed completely flat with zero inside gap. | Maximum strength, flush finishes (e.g., metal cabinets). |
| Open Hem | Folded over but leaves a small, defined air pocket inside. | Thicker metals, or leaving space to slide wires/components inside. |
| Teardrop Hem | Bent past 180 degrees forming a teardrop air gap. | Fragile or brittle metals (like 6061 Aluminum) to prevent cracking. |
| Rolled (Rope) Hem | Curled into a full circle, creating a smooth, hollow tube. | Industrial handles or items requiring a completely safe, ergonomic grip. |
Closed (Flat) Hem
We fold the edge over and press it completely flat under the press brake so there is zero gap inside. We use this when clients need maximum strength and a flush, smooth finish (highly popular for the metal cabinets we fabricate).
Open Hem
This folds over too, but it leaves a small air pocket inside. Why do we recommend leaving a gap? First, it helps us avoid cracking when we work with thicker metals. Second, it leaves room if your assembly team needs to slide a wire or another component inside the fold later.
Teardrop Hem
This bends past 180 degrees to form a teardrop shape. We exclusively use this for fragile metals. If we tried to smash certain aluminum grades totally flat on our machines, they would just break apart. The teardrop gives it a safe bend without the material stress.
Rolled (or Rope) Hem
Instead of a flat fold, we curl the edge into a full circle, creating a smooth tube. This is the absolute best option for handles. When we fabricate custom toolboxes or industrial handles, this is our go-to because it feels completely safe to grip.
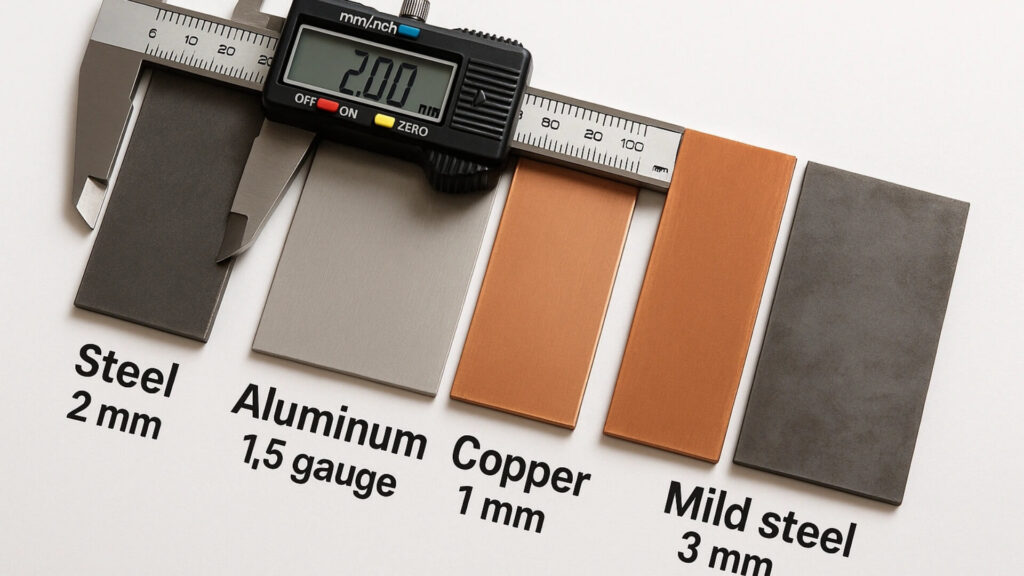
How to Pick the Right Metal for Your Hem
Metals act differently under tonnage. If a junior designer forces a brittle metal into a tight fold on a CAD file, it will snap on the press brake. You just wasted good material.
To save you prototyping time and money, here is our cheat sheet based on what reliably works on our machines. The most common metals used for sheet metal hemming include cold-rolled steel, aluminum, and stainless steel:
- Cold-Rolled Steel (e.g., SPCC): The easy-going workhorse. It bends nicely without snapping. If your sheet is relatively thin, we can safely use a tight Closed Hem.
- Aluminum (e.g., 6061 vs. 5052): Lightweight but can be brittle. We have seen 6061 crack almost every time it is crushed flat. To keep the metal intact, we always advise a Teardrop Hem or an Open Hem to accommodate the reduced ductility of rigid heat-treated alloys like 6061.
- Stainless Steel (e.g., 304): Tough and stubborn. Bending it takes serious machine power. Because it is so hard and prone to springback, a Closed Hem can stress the metal too much. An Open Hem is your safest bet to prevent micro-fractures.
Golden Rules for Designing a Hem
A bad design ruins good metal before our machines even turn on. To get a perfect hem without us having to send your blueprint back for revisions, stick to these three rules for precision press brake hemming:
- Rule #1: Watch your material thickness. Hemming loves thin metal. At ShincoFab, we actively advise against trying to hem sheet metal thicker than 0.125 inches (11-gauge). Heavy-gauge metal will just fight the die and crack under the tonnage.
- Rule #2: Get the flat length right. We need enough material for the machine’s tooling to grip and fold. Make your folding returning edge (flange length) at least four times the thickness of your sheet metal. If it’s too short, it slips out of the die.
- Rule #3: Respect the bend radius. For open hems, do not force an excessively tight turn. The inside curve should be at least equal to your material’s thickness. This relieves stress and keeps the metal from snapping during the press down.
How Does a Press Brake Hem Sheet Metal?
Once your design is dialed in, our shop floor takes over. Here is how our operators execute these folds:
The Press Brake Method
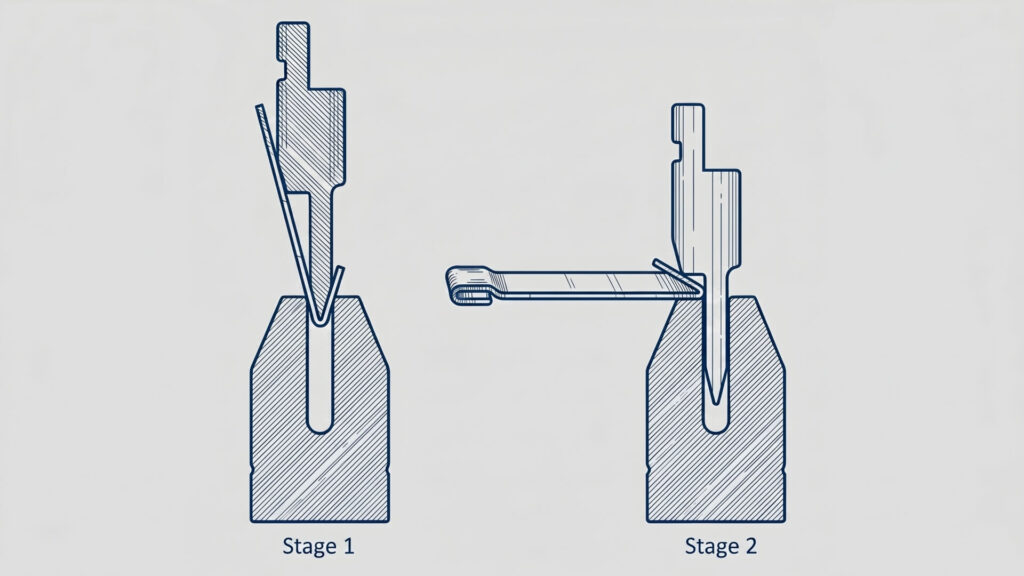
This is our daily standard and is highly reliable for everyday jobs. The standard press brake hemming process is executed in two distinct steps:
- Bend to an acute angle: First, we use a V-die and punch to bend the raw metal edge into an acute angle (typically around 30 degrees).
- Compress the fold closed: Next, we swap to a flattening die (or a specialized hemming die) that comes down and smashes the fold flat against itself.
Die Hemming
Need to make 10,000 parts in a hurry? We quote this for mass production. It uses a custom tool to fold the entire edge all at once. The custom die costs you more upfront, but the production speed significantly reduces the per-part cost.
Roll Hemming
If your metal has a curved edge, a standard press brake won’t work. For this, small rollers guide along the edge, pushing the metal over little by little. It is perfect for complex, curvy automotive or appliance parts.
How to Fix Common Hemming Headaches
Metal has a mind of its own. Here are the most common headaches we troubleshoot on the shop floor, and how we fix them so your order doesn’t get delayed:
- Cracking on the outside edge: Usually happens when crushing a brittle metal flat. Our fix: We pause the run and switch your design to a teardrop or open hem to relieve the stress.
- Warping and bowing: Your flat panel is suddenly wavy. Our fix: The operator has to recalibrate the press brake crowning. We ensure the panel is fully supported and the tonnage is perfectly even across the length of the bed.
- The fold won’t close: The machine can’t grab the edge properly. Our fix: We review your blueprint. Usually, the flange length is too short (less than 4x material thickness).
How Hemming Impacts Your Manufacturing Costs
Every time we bend metal, it adds an operation on the floor, increasing machine time and labor. But you can control this budget:
- Stick to the basics. A standard open or closed hem is cheap. Almost any basic press brake can knock these out quickly.
- Avoid tricky shapes if you can. Teardrop and rolled hems are excellent. But they require special tools and longer setup times. Only pay for them if your metal or design strictly requires it.
- Match the process to the volume. Do not buy an expensive custom die for a small batch of parts. Let the shop use a standard press brake to keep your upfront costs down.
Do You Really Need a Hem? (Cheaper Alternatives)
Sometimes, as your fabrication partner, we will tell you a full hem is overkill. If your budget is tight, consider these alternatives we offer:
- Ask for deburring: If you just want to stop people from getting cut, ask us to deburr or tumble the part. We grind away sharp edges without bending metal. It’s significantly cheaper.
- Make a 90-degree fold: Need to stiffen a floppy panel? A standard 90-degree bend adds serious rigidity with just one quick hit on the press brake, saving the secondary flattening step.
Conclusion
Sheet metal hemming doesn’t have to be complicated. It really comes down to matching the right fold with the right metal. Do it right, and you get a part that is safe, strong, and looks highly professional.
Now you have the playbook from a fabricator’s perspective. You know when to smash a hem flat, when to leave an open gap, and when a simple deburring job is your best bet.
The only thing left is turning your blueprint into actual metal. The crew at ShincoFab is here to handle the bending. We fabricate sheet metal every day and know exactly how to execute your design without the scrap and headaches. Pick the right hem, send us your STEP or DXF files, and let’s get to work.