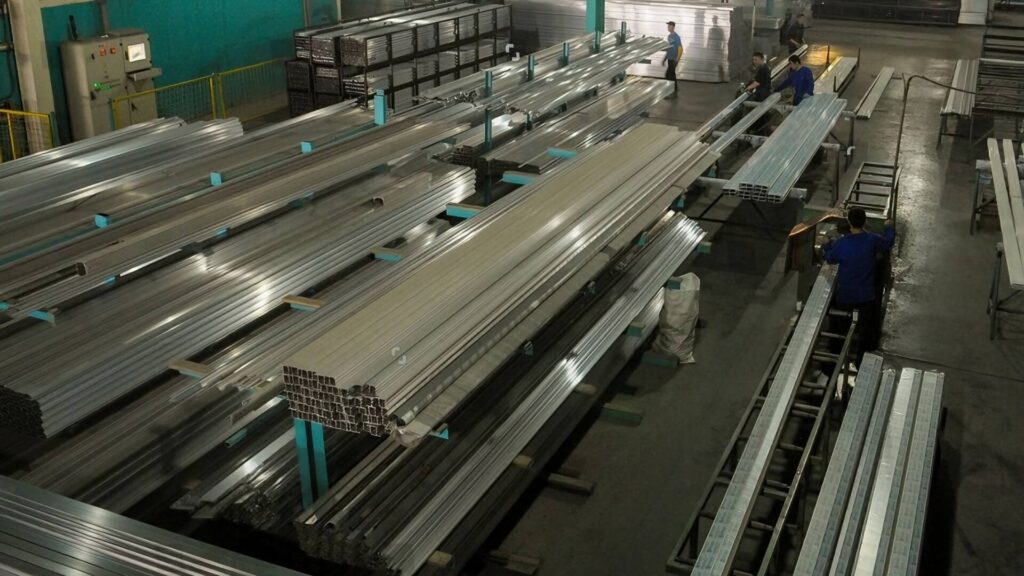
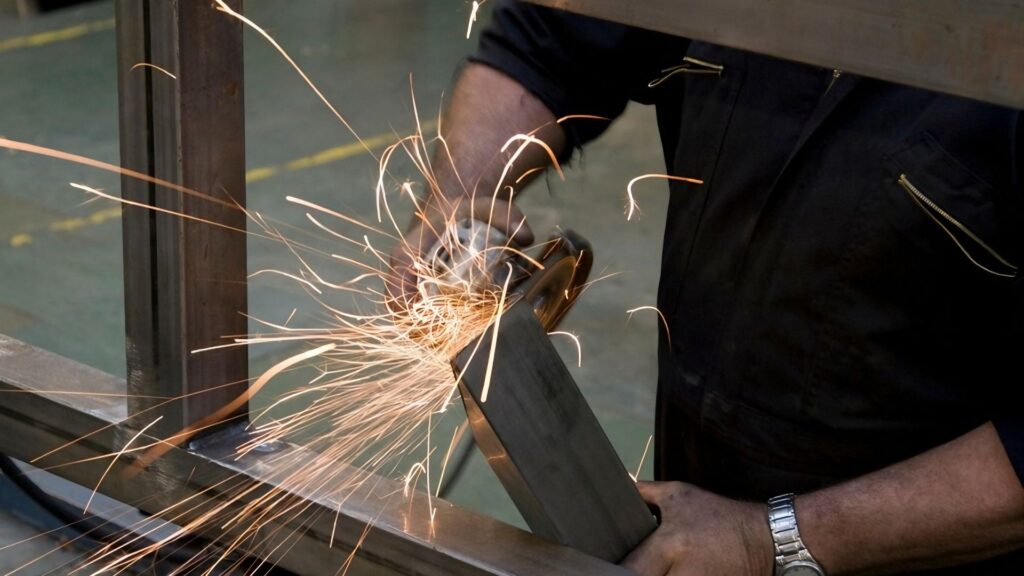
I have spent years managing production lines and overseeing custom fabrication projects at our facility, so I know that a strong structure starts with the proper setup. We see it all the time with client blueprints. They often have great designs on paper that fail on the shop floor because the joint configuration wasn’t practical.
In this guide, I will strip away the jargon and explain the five standard types of welding joints so you can build your next project with confidence.
The Difference Between a Welding Joint and a Weld
Many beginners use these terms interchangeably. They shouldn’t.
The Joint is the physical arrangement. It is simply how you position the two pieces of metal before you even pick up the torch. Are they lying flat side-by-side? Are they overlapping? That setup is the joint.
The Weld is the result of your work. It is the molten filler metal and the actual fusion that bonds the joint together.
Think of it like building a deck. The joint is where two wooden boards meet. The weld is the nails and screws that hold them there.
You can actually use different types of welds on the exact same type of joint. But before we talk about welding techniques, we have to get the setup right.
There are five industry-standard ways to arrange your metal. Let’s break them down.
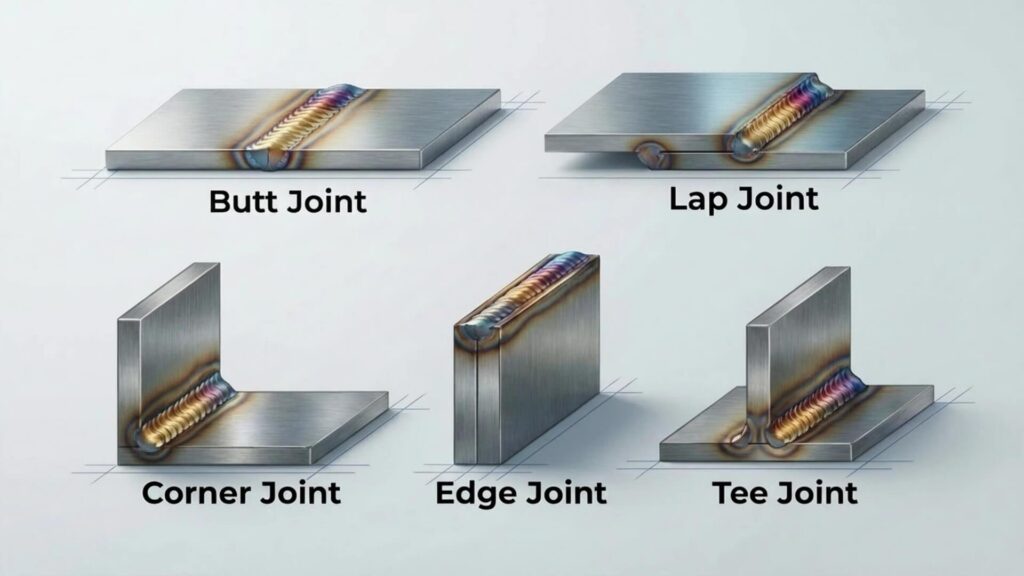
The 5 Standard Types of Welding Joints
According to the American Welding Society (AWS), there are five standard ways to position your metal. Master these five setups, and you can build almost anything.
1. Butt Joint
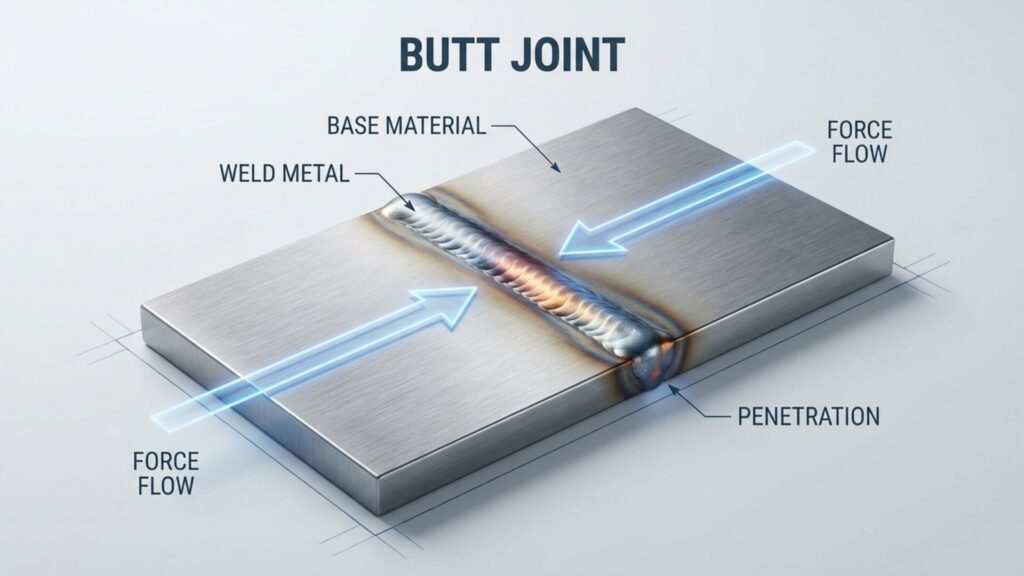
This is the most common setup you will see. It is exactly what it sounds like. You simply butt two pieces of metal up against each other on a flat plane.
Imagine taking two playing cards and taping them edge-to-edge. That is a butt joint.
Best used for:
- Connecting sections of pipe.
- Joining flat plates to create a larger surface.
The Good:
- High Strength: If you weld it right, the joint becomes as strong as the base metal itself.
- Smooth Finish: Since the parts sit flat, you can grind the weld flush. Once painted, the seam completely disappears.
The Bad:
- Burn-through: On thin metal, it is very easy to blow a hole right through the gap if you aren’t careful.
- Prep Work: On thick stock, you can’t just butt them together. You usually have to bevel (angle) the edges into a “V” shape so the weld penetrates all the way to the bottom.
💡 Experience from the Factory Floor
At ShincoFab, we often handle large stainless steel enclosures requiring Butt Joints. One specific challenge we face isn’t just the welding, but the fit-up before welding. If the laser cutting tolerance is off by even 0.5mm, the gap becomes inconsistent. In a home garage, you can bridge that gap by hand. But in our industrial setting, an inconsistent gap means the robotic welder might burn through. We learned the hard way that a Butt Joint is only as good as the cutting machine that prepped the edges.
If you handle the prep work, this joint is unbeatable. Now, let’s look at what happens when you change the angle.
2. Tee Joint (The “T” Shape)
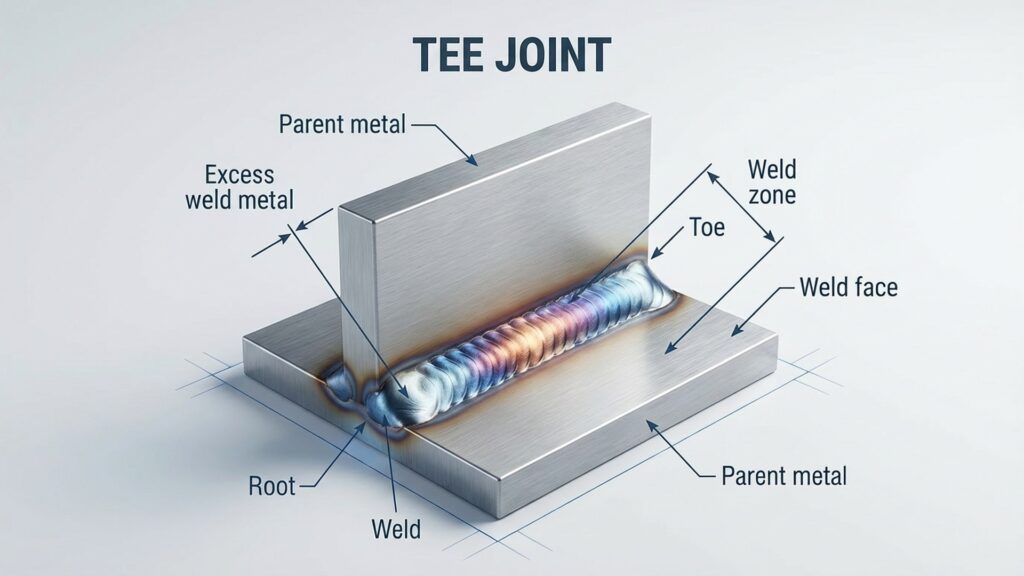
As the name suggests, this setup looks like an upside-down “T”. You place the edge of one piece against the flat face of another at a 90-degree angle.
Best used for:
- Structural stands and table legs.
- Adding bracing for support.
- Attaching a pipe or tube to a flat base plate.
The Good:
- Shear Strength: This joint is excellent at resisting forces that try to slide the pieces apart. It offers great rigidity.
The Bad:
- Hard to Penetrate: Getting the weld deep into the inside corner is tricky. If you don’t use enough heat, the weld will just sit on top like a caterpillar without grabbing the root.
💡 Real-World Insight
I remember a batch of structural brackets where the client specified a Tee Joint but didn’t account for lamellar tearing. This is a defect where the base metal rips apart internally under stress. Because the steel plate was too thick and the weld too aggressive, the joint successfully held, but the steel plate itself delaminated. This experience taught us a valuable lesson. For heavy-duty Tee joints in our factory, we now strictly verify the steel grade direction before assembly.
The Tee joint connects in the middle of a plate. But what if you need to connect the edges to make a box? That is where the next joint comes in.
3. Corner Joint
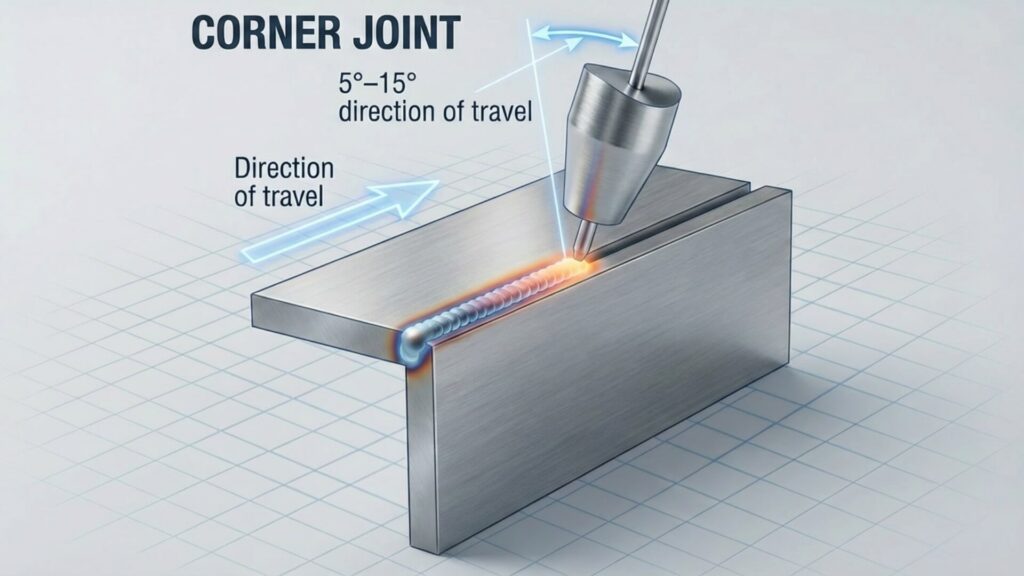
This joint forms an “L” shape. It happens when two pieces of metal meet at a 90-degree angle at their very edges.
You can set this up in two ways. There is the Open Corner (where the edges touch tip-to-tip to form a V) or the Closed Corner (where one face sits flush against the edge of the other).
Best used for:
- Fabricating frames.
- Building metal boxes or tanks.
- Making rectangular tables.
The Good:
- Easy Assembly: It is fast to fit up. You generally don’t need much edge preparation to get started.
The Bad:
- Warping: This is the biggest headache. Because you are welding on the outside corner, the heat pulls the metal inward. If you don’t clamp it down tight, your square box will end up crooked.
💡 Factory Floor Tip
Aesthetic finish is usually the priority here. When we fabricate control cabinets for electronics, we use Corner Joints specifically because they are easier to grind smooth. A Closed Corner joint allows our finishing team to grind the radius perfectly round so it looks like a single bent piece of metal. If you want that ‘seamless’ Apple-store look for your enclosure, this is the joint we will recommend during the design phase.
Corner joints are great for edges, but what if you need to patch a hole in the middle of a sheet? That requires a stacking approach.
4. Lap Joint
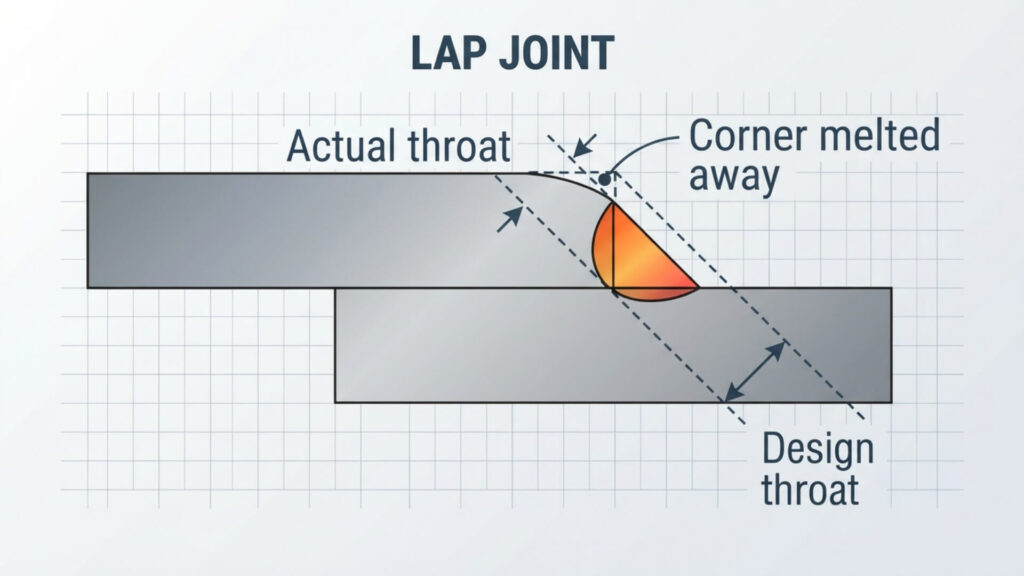
A lap joint is created by stacking the edge of one piece over the top of another. They overlap each other, just like shingles on a roof.
Best used for:
- Thin sheet metal.
- Repairing rust holes (patching).
The Good:
- Very Forgiving: This is the easiest joint for beginners to learn to weld. The double thickness acts as a heat sink, so it is much harder to burn a hole through the metal.
- Zero Prep: You rarely need to bevel or grind angles. Just clean the surface, clamp it, and weld.
The Bad:
- Not Flush: You will always have a step or bump in the metal. It isn’t smooth.
- Rust Traps: Moisture can easily get stuck between the two layers. This causes the metal to rust from the inside out over time.
💡 Experience from the Factory Floor
While arc welding Lap Joints is common in DIY repairs, in our factory production, Lap Joints are the king of Spot Welding. When we produce automotive brackets or internal chassis parts, we almost exclusively design Lap Joints because they allow our resistance spot welders to clamp and fuse the sheets instantly. It’s faster than running a bead and introduces far less heat distortion.
Overlapping is easy, but sometimes you just need to fuse two edges that are standing side-by-side. That brings us to the final type.
5. Edge Joint
Imagine closing a book and looking at the pages. That is an edge joint. You stack two plates parallel to each other and run a weld bead along the top edges where they meet.
Best used for:
- Mufflers and exhaust parts.
- Sheet metal casings that don’t hold weight.
The Good:
- Fast: It is incredibly quick to zip two edges together. You don’t need fancy clamps or complex fit-up.
The Bad:
- Weak: This joint has very shallow penetration. The weld sits on the surface, so it cannot handle heavy stress. Never use this for something that needs to lift a load.
Now you have the five standard options. Before we move on to application, let’s quickly recap.
Quick Comparison: The 5 Welding Joints at a Glance
Short on time? Here is how the five joints stack up in terms of strength, preparation, and best use cases.
| Joint Type | Visual Geometry | Best For | Strength Profile | Fab Intensity (Prep Work) |
|---|---|---|---|---|
| Butt Joint | ➖ ➖ (Edge to Edge) | Pipes, Heavy Plate Splicing | High (Tensile Load) | High (Requires precise cutting & beveling) |
| Tee Joint | ⊥ (Perpendicular) | Structural Brackets, Table Legs | High (Shear/Compression) | Medium (Watch for lamellar tearing) |
| Lap Joint | 📚 (Overlapping) | Thin Sheet Metal, Spot Welding | Medium (Shear Load) | Low (Very forgiving fit-up) |
| Corner Joint | 📐 (L-Shape) | Box Frames, Tanks, Casings | Low-Medium (Depends on bracing) | Low (Focus is on aesthetic finish) |
| Edge Joint | 📒 (Parallel Stack) | Unloaded Parts, Mufflers | Low (Non-structural only) | Low (Fastest assembly) |
But before we talk about picking one, we need to clear up a massive confusion: the difference between the joint and the weld itself.
How to Mix and Match Joints with Weld Types
This part confuses almost everyone when they start. You might ask if something is a Tee joint or a Fillet weld.
The answer is both.
Think of this like a Mix and Match menu. You have the Joint (the setup) and the Weld (the shape of the bead). You can use the same weld technique on different setups.
- The Fillet Weld: This is the triangular bead of metal. You can use a Fillet weld on a Tee Joint, a Lap Joint, or a Corner Joint. It’s the same technique, just applied to different shapes.
- The Groove Weld: This is used to fill a gap. You usually use a Groove weld on a Butt Joint. You are essentially filling in the trench between two flat plates.
So, don’t get hung up on the names. Focus on fitting the pieces together correctly. Because if you pick the wrong joint for the job, you aren’t just wasting time—you might be building something dangerous.
Now that we have the names straight, let’s talk about strength. Why would you pick a Butt joint over a Lap joint? It comes down to physics.
Understanding How Welding Joints Handle Stress
Engineers love using big words like “tensile” and “shear.” But you don’t need a physics degree to build a table. You just need to visualize how things break.
Here is the simple version of how stress works:
- Tensile (The Tug-of-War): Imagine pulling a rope from both ends. That is tensile strength. A Butt Joint is perfect for this. It aligns the metal in a straight line so it can tough it out against the pull.
- Shear (The Deck of Cards): Put a deck of cards on a table and slide the top card sideways. It slides right off the bottom one. That is shear sliding. A Lap Joint is designed to stop this. It pins the layers together so they can’t slide past each other.
- Bending (Snapping a Twig): Grab a stick and try to snap it over your knee. That is bending force. Corner Joints hate this. If you push hard on the side of a metal box, the corner wants to snap open. You usually need to weld the inside and outside, or add a brace, to stop it from opening up.
You understand the physics. Now, let’s take that theory and apply it to your actual project checklist.
How to Choose the Right Joint for Your Project
Don’t just flip a coin. The “best” joint depends entirely on what you are building. Ask yourself these three questions before you cut your metal.
How thick is the metal?
Thick steel plates need deep penetration, so Butt or Tee joints are standard. Thin sheet metal is different. It loves Lap joints. Overlapping the edges doubles the thickness and stops you from burning holes through the part.
What is the load type?
How will the part be stressed? Will it be pulled, twisted, or squashed? Butt joints are great for pulling (tension). Tee and Corner joints add stiffness to stop things from bending.
Do you have access?
Can you reach both sides with your torch? If you can only weld from the front, you might need an Open Corner joint to ensure the weld sinks all the way in.
So, you know the rules. But what happens if you ignore them? Spoiler alert: It’s not just ugly, it’s dangerous.
What Happens If You Choose the Wrong Joint?
Most textbooks only show you the perfect diagram. They rarely warn you about the disasters. But in the real world, picking the wrong joint isn’t just an “oops” moment—it can destroy your project.
Here are two classic rookie mistakes:
Mistake 1: Using an Edge Joint on a trailer hitch
The Result: It will snap right off. Edge joints have very shallow penetration. They are fine for a muffler, but they cannot handle the heavy pulling force of a trailer. The metal will just peel apart.
💡A Cautionary Tale
We once had a client send us a prototype design for a heavy-duty lifting frame using Edge Joints to save assembly time. I had to reject the drawing immediately. I’ve seen Edge Joints peel open like a banana under shear load. We re-engineered it to a full-penetration Butt Joint, which increased the welding time but ensured the part wouldn’t fail. As a manufacturer, we sometimes have to protect clients from their own convenient design choices.
Mistake 2: Using a Butt Joint on a thin car panel without a backer
The Result: You will blow a hole right through it. Thin sheet metal melts instantly if you try to butt weld it without something behind it to absorb the heat. You end up with a jagged hole instead of a smooth seam.
You’ve picked the right joint and you know the risks. Now, there is only one step left before you pull the trigger: getting the metal ready.
Prepping Your Metal for Stronger Welds
You can pick the perfect joint, but if you don’t prep it correctly, it will fail. A dirty joint is a weak joint.
Clean it first
Rust, paint, and oil are the enemy. If you try to weld over them, those impurities get trapped in the molten metal. This causes bubbles (porosity) and cracks. Always grind your metal until it is shiny and bright before you start.
Know when to bevel
If your metal is thick (usually over 1/8 inch), you cannot just butt the edges together. The weld won’t soak in deep enough. Use a grinder to cut an angled edge on both pieces. When they meet, they form a “V” groove. This channel lets you weld all the way to the bottom.
Clamp it tight
Fit-up is just welder-speak for how tight the pieces fit together. Big gaps are hard to fill. Plus, metal likes to move when it gets hot. If you don’t clamp it down hard, your straight joint will twist into a pretzel.
Your metal is clean, clamped, and ready to go. To wrap things up, let’s answer a few common questions new welders always ask.
Frequently Asked Questions
Which joint is the strongest?
There isn’t one single strongest joint. It depends on how you pull on it. However, a properly welded Butt Joint is generally considered the strongest. When done right with full penetration, it makes the two pieces act like one solid sheet of steel.
Do I always need to bevel a Butt joint?
No. If the metal is thin (like sheet metal), you can leave the edges square. But any metal thicker than 1/8 inch usually needs a bevel. Without that “V” channel, your weld will just sit on the surface like a band-aid instead of digging in deep.
What is the easiest joint for a beginner to learn?
The Lap Joint. Since one piece sits on top of the other, it creates a natural shelf to guide your torch. Plus, it is very forgiving. The extra thickness stops you from burning holes through your project while you are learning to control the heat.
Conclusion
Welding joints are like puzzle pieces. When you pick the right one and fit it perfectly, the final picture is strong and seamless.
Whether you are building a simple table or fixing a trailer, remember the golden rules: match the joint to the stress, clean your metal until it shines, and never skip the prep work.
However, sometimes a project is too big, too complex, or requires precision that a DIY garage setup just can’t handle. There is a massive difference between welding a single bracket in a garage and welding 500 units that all need to be identical within a millimeter.
At ShincoFab, we provide professional sheet metal fabrication services to clients worldwide. My team makes these critical joint decisions daily to ensure the perfect balance between structural integrity and cost-efficiency. From laser cutting to precise welding assembly, we manage the complex geometry requirements for you.
Now that you understand the basics, go assess your project. If it’s time to build, get out there and make some sparks./